 Sample DSTAT Setup Task List Sample DSTAT Setup Task List
The Daily Accounting Journal has many different names at different
companies (Greensheet, Daily Accounting Report DAR, Daily Revenue Report DRR,
Flash Report, Early Bird, etc.), but in every case its purpose is the
same. The Daily Journal is designed to communicate daily totals from the
hotels to the corporate office, and standardize the format of the data
regardless of what systems the hotel uses. Most companies already have an
established format, and the first step in setting up DSTAT is to get a version
of the daily report entered into Excel. Each page of the journal (or other
daily reports) should be created as separate worksheets (tabs) under one
workbook.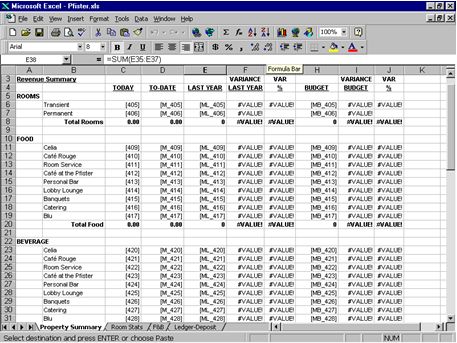
2. Modify your spreadsheet so it works with DSTAT.
Create the
spreadsheet using formulas for totals and other calculated values, just as you
would if you were going to use Excel to create your daily spreadsheet. DO
NOT include ancillary fields or spreadsheets used to enter greater detail, but
is not printed as part of the Daily Journal itself. You are creating a
custom report; you need only be concerned about the desired output. The
data entry portion of DSTAT will be configured in a separate part of the
program.
In the sample at right, you can see how the various cells are
configured to work with DSTAT:
Column C ľ Today: Values come from fields on
the input screens, and are identified by entering a Journal Cell Address in
brackets (e.g. [405] represents Transient Revenue).
Column D ľ Month to Date:
These values are accumulated by adding together the individual daily values for
the corresponding line. M_ must proceed the cell address to identify
it as monthly, and the address number itself must correspond to the address of
Column C Today.
Column E ľ Last Year Month To Date: Using the same cell
address as in column C with a prefix of ML_ will set DSTAT to calculate
and enter the corresponding Month To Date values as they were last
year.
Column F ľ Variance to Last Year: This cell is a calculated
value. To create variance columns or rows, or subtotals, you simply write
traditional Excel formulas using the row and column positions from the
spreadsheet.
Column H ľ Month to Date Budget: When the cell address is
proceeded by an MB_ DSTAT will automatically enter the month to date Budget
values that were either imported or typed into the Budget portion of
DSTAT.
In the sample above columns G, I, and J are also created using Excel
formulas
NOT shown in sample
Same Day Last Year: Many daily reports contain
this comparison, and by using the same cell address used in column C but
proceeded by an L_ DSTAT will automatically calculate and enter the
corresponding value from the same day last year.
Daily Budget Value: Some
items (such as Rooms Sold, Covers, Etc.) often have daily budget values.
Putting B_ in front of the cell address will set DSTAT to enter the
corresponding daily budget value.
Daily Forecast Values: Place F_ before the
cell address if want to retrieve Daily Forecast values.
Month to Date
Forecast Values: Use MF_ before the cell address to have month to date forecast
values.
3. Print out the completed spreadsheets (note: you may have as
many pages as you desire). Each page (or report) is contained on a tab
within the workbook.
4. Gather up all reports used to complete the data
entry for you daily reports.
The various statistical, revenue, expense, and
ledger totals needed to complete the daily journal normally come from a variety
of reports. Often times a combination of Property Management, Point of
Sale, Call Accounting, and Time and Attendance systems reports are needed to
complete the data entry process. You should gather a sample of every
report needed.
5. Map out how the source reports relate to the Daily
Journal itself.
Using the Daily Journal sample you printed in step 3, review
each source report and determine the correct journal cell address for each value
on the report. It is likely that some values on the source reports will
not be loaded to the journal, and subsequently wonĺt have a corresponding
address. It is also likely that some journal cell addresses will be the
result of several values from the source reports. This issue is addressed
within DSTAT itself, since the same cell address can be used for more than one
source value.
6. Install the DSTAT program.
Follow the installation
instructions in the DSTAT Manual.
7. Select the desired spreadsheet.
After installing DSAT, follow
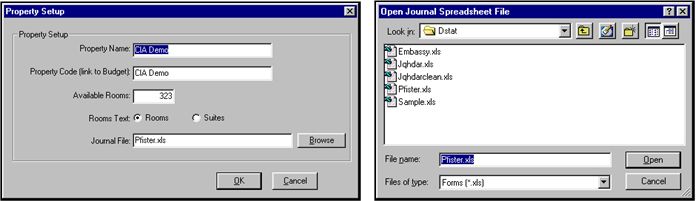
the manual instructions on setting up a property in DSTAT.
When you are setting up your property, click on the Browse button next to the
Journal File field. Locate and select the Journal you created in Excel in
the earlier steps. In order to locate the file, you will need to remember
the name you gave the file and the folder in which you saved
it.
8. Proceed to the Set Up Input Screens
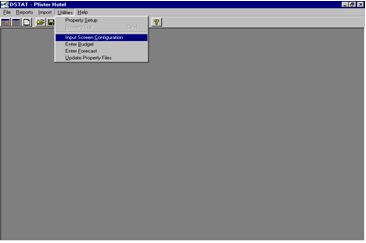
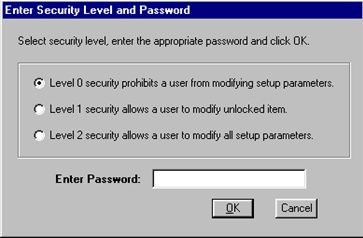
In order to create Input Screens you need Password access to Level 2
security. If you do not know the appropriate password, contact your
corporate office.
9. Take the reports gathered in step one, and for each
report create an input screen. Instructions are as follows:
One of the
features of DSTAT is the way in which it allows you to create input screens that
closely resemble the source reports that the night auditor works with, and then
automatically converts the data entered into those screens onto the Daily
Journal. Because this automation is controlled through your setup, often
times the auditor doesnĺt even have to know or understand how the data is
related.
(See diagram on next page.)
A. The program will begin
you on Section 1.
B. Using the first of your source reports as a basis,
enter the name of the report in the field labeled ôSection Titleö. In the
Daily Input part of DSTAT this Section Title appears on the Tabs that the
auditor sees, and by naming after the source report the auditor is able to
easily match the reports with the appropriate screen, even if the reports are
sometimes in a different order.
C. In the ôInstructionsö field you can
provide a more detailed description of where the report is generated (what
system and section the report is printed from, etc.). In the event that
the report has multiple columns (not accommodated in DSTAT) the instructions
tell the auditor the order in which the data can be keyed.
D. Begin the
process of creating entry fields for each item found on the source report.
Because DSTAT allows you to select what information goes to the journal, you can
include all fields even those not needed to complete the daily. Because
you can use the same cell address for more then one input item, it is not
necessary to manually add values from the source reports together. DSTAT
will add together all input fields labeled for a journal cell. This makes
it easier for the auditor to key straight off the reports.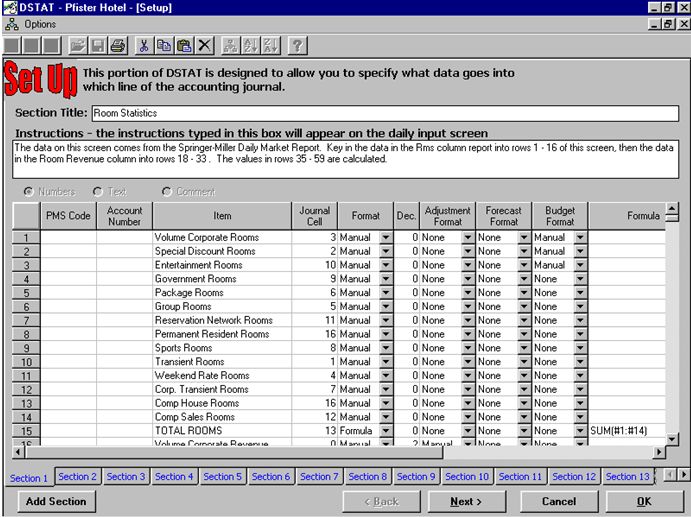
Columns
E. PMS Code: Many Property Management, Point of Sale, and
other systems have specific codes for values on their reports. Including
those codes on the input screen provides another way for the auditor to match
the values on the source reports to the input screens. These codes are
used for Electronic Data Interface (EDI) to the PMS and other
systems.
F. Account Number: This code represents the account number in
your accounting system to which the values should be loaded. Not all of
the items listed will have a corresponding Account Number, so some of these
fields will be left blank, and some individual lines will be combined into the
same account number. You can enter the same account number for more than
one line item. You must enter these codes if you wish to interface DSTAT
directly to your accounting system.
G. Item: A text description of the
item to be entered. This will normally match the description on the source
report.
H. Journal: This field identifies the cell address of the daily
journal (or other custom report) to which the data needs to be loaded.
Using the Map you created in step 5. enter the cell address number for each
item. If there are items on the report that are not needed on the Journal,
leave this field blank. If there are multiple items that have to be added
together to complete a value on the daily, put the same cell address in all the
required items.
I. Format: This field indicates how data for this field
will get entered into the program.
None - No data entry for this item,
Manual ľ Data is typed manually for this item,
Formula ľ data is a
calculated value based on other items in the section,
Import ľ Data is
imported from an external source (e.g. PMS)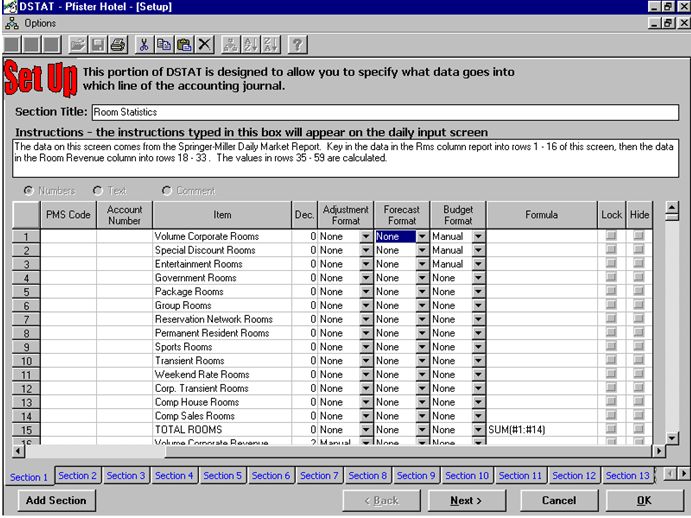
J. Decimal Places: The number of decimal places to
display.
K. Adjustment Format: For each item you list, DSTAT
automatically creates an accompanying adjustment column in the daily input
portion of the program. The options for setting up the adjustments are the
same those listed for ĹFormatĺ. If None is specified, then the Net
value will be equal to the Gross Value.
L. Forecast Format: This filed
is used to indicate how forecast values will get entered into DSTAT. This
column has the same options as ĹFormatĺ.
M. Budget Format: This column
defines how budget values will be loaded into DSTAT.
Manual ľ daily value is
calculated based on even spread of value entered under ĹEnter Budgetĺ,
Formula ľ use ĹFormulaĺ,
Import ľ get budget value from an external
source (e.g. CIA budget system). Or, load a monthly value from a separate
spreadsheet and prorate by Elapsed Days in the accounting
period.
N. Formula: Some items, such as sub totals, can be calculated
rather than manually entered. These entries are spreadsheet formulas based
on values in the current section.
O. Lock: If checked, setup data
for this item cannot be changed without Level 2 password.
P. Hide: If
checked, this item does not display on the Daily Input screen. This is
useful for obsolete items that need to be retained for historical purposes, or
for certain items that are not applicable to a specific hotel.
After you have completed all of the setup for the first report, click on the
Add Section button at the bottom of the screen to work on the next section
(source report).
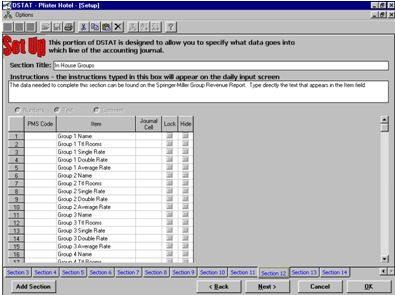
Other Set Up Screen Options
You will notice when you add a new section you
have the option of making a Numerical, Text, or Comment Section. This is
to accommodate the various types of data that often goes on Daily Reports.
The screen described in the section above is the Numerical screen.
Some information that goes on daily journals is more text then number
oriented (such as In House Groups, Weather, Etc.). To accommodate this
type of data, you have the option of creating a ôTextö type entry screen.
These screens will provide fields where the auditor can type in Text entries
during the daily entry process.
10. Access ôEnter Yesterdays Totalsö and enter
all required values.
To test your setup and formats, take all of the source
reports for yesterday and key the data into the screens. Verify that; the
screens contain all the necessary fields, the instructions are correct, and any
formulas are working.
11. Print the Journal and verify the totals
against you exiting daily report.
With all of the input screens complete,
press the finish button at the bottom of the input screen. When the
journal is displayed, press the print button. Compare the printed journal
to your actual daily. Verify; formulas are working correctly, data is feed from
the input screens correctly, and there is no missing data.
12. Make any
necessary changes to the DSTAT formats.
13. Enter budget values as
directed by the Company Specific Instructions section of the
manual.
14. Enter historical values as directed by the Company Specific
Instructions section of the manual.
15. Enter forecast values as
directed by the Company Specific Instructions section of the
manual.
16. Enter additional daysĺ data.
With history, budget, and
forecast data loaded, enter a second dayĺs worth of information. Reprint
the journal. Verify: Historical totals, Budget totals, Forecast totals,
that Month to Date is accumulating correctly, and that variances are calculating
correctly.
17. Make any necessary changes to the DSTAT
formats.
18. Begin using DSTAT daily.